写在前面
因为网上文档众多,本文不会赘述 OSPF 技术原理,在此只讲关键互通的几点:
- OSPF ID (Router ID)必须唯一;
- 两台设备间如果要建立 OSPF ,仍需手动配置一个互通网络,并在 OSPF 中两端都要宣告该网段;
试验过程
实验网络信息
交换机
创建互通网络,vlan2345
配置 vlanif 地址,10.23.45.1/24
宣告网络段
互通网络段
10.23.45.0/24
内网网络段
10.23.46.0/24
10.23.47.0/24
Mikrotik ROS路由器
创建互通网络,vlan2345
配置 vlanif 地址,10.23.45.2/24
宣告网络段
互通网络段
10.23.45.0/24
试验预期
- 路由器可以自动生成10.23.46.0/24、10.23.47.0/24两段通往交换机的路由。
详细配置
OSPF 对接配置
交换机配置
# 进入系统终端
<NesHomeLab-S5720>sys
Enter system view, return user view with Ctrl+Z.
[NesHomeLab-S5720]

# 创建互通vlan,id为2345
[NesHomeLab-S5720]vlan batch 2345
Info: This operation may take a few seconds. Please wait for a moment...done.

# 创建vlanif接口,并设置内网ip
[NesHomeLab-S5720]interface Vlanif 2345
[NesHomeLab-S5720-Vlanif2345]ip address 10.23.45.1 24
[NesHomeLab-S5720-Vlanif2345]q

# 创建进程号为1的ospf进程,并指定router-id为0.0.0.1
# router-id与网络段并无实际关系,但要确保局域网内唯一即可,格式为点分十进制
[NesHomeLab-S5720]ospf 1 router-id 0.0.0.1
[NesHomeLab-S5720-ospf-1]dis this
#
ospf 1 router-id 0.0.0.1
#
return

# 进入area 0,即 0.0.0.0 的区域ID(Area ID)
[NesHomeLab-S5720-ospf-1]area 0

# 宣告网络
[NesHomeLab-S5720-ospf-1-area-0.0.0.0]network 10.23.45.0 0.0.0.255

# 查看宣告网段
[NesHomeLab-S5720-ospf-1-area-0.0.0.0]dis this
#
 area 0.0.0.0
  network 10.23.45.0 0.0.0.255
#
return
[NesHomeLab-S5720-ospf-1-area-0.0.0.0]q
[NesHomeLab-S5720-ospf-1]q

# 查看当前邻居状态,只有进程自身,无其他邻居关系
[NesHomeLab-S5720]dis ospf peer

	 OSPF Process 1 with Router ID 0.0.0.1
路由器配置
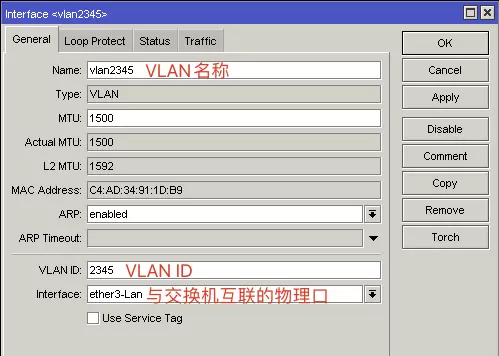
在 Interfaces–Interface–加号–VLAN,进行vlan创建

主要填写、选择以下三点,VLAN名称、VLANID,以及选择与交换机互联的物理口
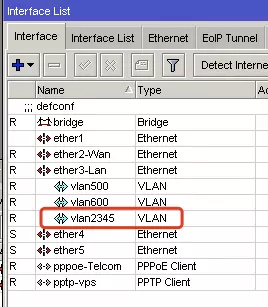
Interface 界面确认存在刚才创建的 VLAN
进入 IP–Address,为刚才创建的 VLAN 配置内网IP

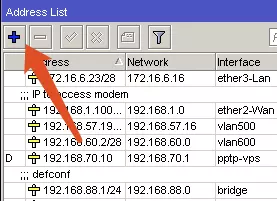
确保地址及VLAN接口正确

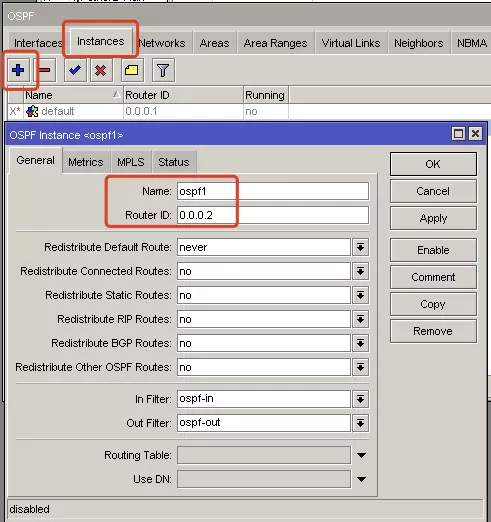
接下来进入 Routing–OSPF–Instance 界面,创建ospf实例
填写实例名称及 Router ID ,务必确保ID唯一

进入 Areas 界面,为 OSPF 实例创建区域,注意两点
- Instance 要选择刚才创建的实例名(ospf1)
- Area ID 要与交换机的一致( 即 0.0.0.0 == area 0 )
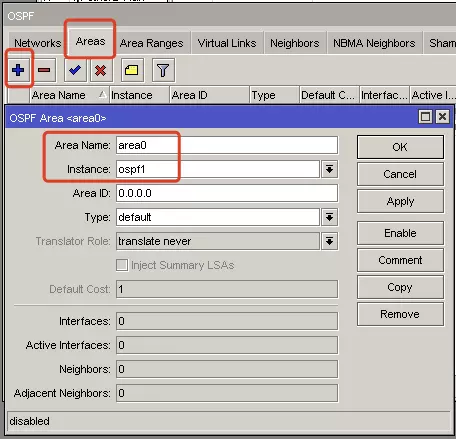
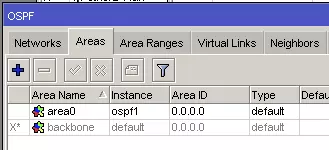
完成添加
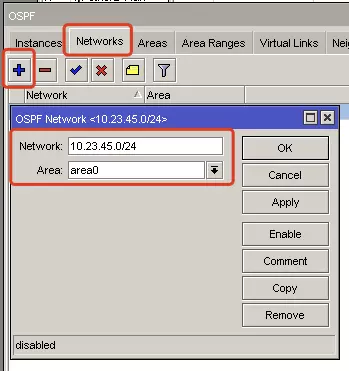
进入 Networks ,为刚才新建的区域宣告网络段

在 OSPF 的 Interfaces 界面下确认当前状态及邻居情况

同样在交换机端也确认邻居状态已建立
[NesHomeLab-S5720]dis ospf peer

	 OSPF Process 1 with Router ID 0.0.0.1
		 Neighbors

 Area 0.0.0.0 interface 10.23.45.1(Vlanif2345)'s neighbors
 Router ID: 0.0.0.2          Address: 10.23.45.2
   State: Full  Mode:Nbr is  Master  Priority: 1
   DR: 10.23.45.1  BDR: 10.23.45.2  MTU: 1500
   Dead timer due in 32  sec
   Retrans timer interval: 4
   Neighbor is up for 00:01:53
   Authentication Sequence: [ 0 ]
宣告路由
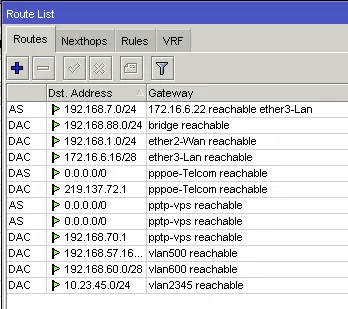
确认当前 ROS 上路由情况
交换机创建新的内网vlan及配置vlan网关
# 创建VLAN
[NesHomeLab-S5720]vlan batch 2346 2347
Info: This operation may take a few seconds. Please wait for a moment...done.

# 配置网关IP
[NesHomeLab-S5720]interface Vlanif 2346
[NesHomeLab-S5720-Vlanif2346]ip address 10.23.46.1 24
[NesHomeLab-S5720-Vlanif2346]q

[NesHomeLab-S5720]interface Vlanif 2347
[NesHomeLab-S5720-Vlanif2347]ip address 10.23.47.1 24
[NesHomeLab-S5720-Vlanif2347]q
[NesHomeLab-S5720]
交换机侧宣告新建内网路由 VLAN 2346、2347
# 进入OSPF实例的区域0
[NesHomeLab-S5720]ospf 1
[NesHomeLab-S5720-ospf-1]area 0
# 检查当前宣告情况
[NesHomeLab-S5720-ospf-1-area-0.0.0.0]dis this
#
area 0.0.0.0
network 10.23.45.0 0.0.0.255
#
return
[NesHomeLab-S5720-ospf-1-area-0.0.0.0]
# 宣告新的内网网络段
[NesHomeLab-S5720-ospf-1-area-0.0.0.0]network 10.23.46.0 0.0.0.255
[NesHomeLab-S5720-ospf-1-area-0.0.0.0]network 10.23.47.0 0.0.0.255
# 确认宣告配置
[NesHomeLab-S5720-ospf-1-area-0.0.0.0]dis this
#
area 0.0.0.0
network 10.23.45.0 0.0.0.255
network 10.23.46.0 0.0.0.255
network 10.23.47.0 0.0.0.255
#
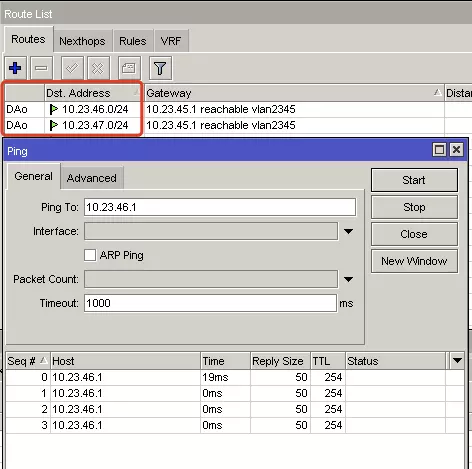
return回到 ROS 的路由界面,确认已自动新增路由,状态为DAo,即为 OSPF 创建,并 Ping 测可通。
以此省去了路由也要建立多个VLAN,并逐一路由做通的麻烦。
done.