前序
先前通过官方分支实现Nginx-Quic,但因支持过程需要改动较多系统组件,相关链接:https://nestealin.com/ce9634bf/
所以本次将通过Cloudflare提供的Quiche补丁,让官方主线版Nginx支持Quic协议。
背景
Quic已经作为了下一代http协议HTTP3的实现。以前给大家介绍过quic的实现智能依靠Golang的quic库实现。在web中的表现即为前文所述的CADDY服务器实现quic:CentOS7.6安装Caddy服务器及PHP7.4环境,实现QUIC配置。
作为web服务器两大扛把子Apache httpd和NGINX一直没有动静。httd目前为止是没有任何动静,但是NGINX有传言开发原生支持quic.但目前到了1.17.4版仍然没有测试版发出。
这个时候我们就要感谢边缘计算CDN行家CloudFlare了。他们家的特色就是精研各种有利于CDN类边缘计算web服务的开源技术实现。从他们以前支持 openresty 开源开发就可见一斑。最新消息 CloudFlare 已经成功在CDN业务中实现了QUIC的部署,那意思就是已经成熟了。其基于HTTP3 Quic的实现靠的就是他们开发的Quiche实现。其中有一个patch就是为了NGINX补丁实现基于其Quiche和谷歌Boringssl 实现的HTTP3 Quic协议。 https://blog.cloudflare.com/experiment-with-http-3-using-nginx-and-quiche/
言归正传,开工。
注意:本文只探讨关于nginx编译实现quic
准备官方Nginx源码
下载最新的nginx,解压缩
cd ~ && mkdir nginxsrc && cd nginxsrc

wget http://nginx.org/download/nginx-1.18.0.tar.gz

tar zxvf nginx-1.18.0.tar.gz
准备QUICHE补丁
下载最新的CloudFlare QUICHE及其子项目,其实子项目就是BoringSSL
git clone --recursive https://github.com/cloudflare/quiche运用QUCHE中的NGINX补丁包为NGINX打上补丁
cd nginx-1.18.0
patch -p01 < ../quiche/extras/nginx/nginx-1.16.patch
准备编译环境
完成NGINX编译的关联软件
为了实现QUIC,NGINX编译必须用到quiche的相关库及BoringSSL的库文件。但这个两个东东编译起来有些软件是必须的,并且要求还挺高。难就难在这了。
BoringSSL编译需要CMake 3.0或更高版本 、 需要最新版本的Perl 环境、需要 GCC(4.8+)和Clang 、 需要Go语言最新稳定版本。
QUICHE Rust 1.38或更高版本才能构建。可以使用rustup安装最新的稳定Rust版本、新版本的 cargo命令
CMKAE和Perl环境更新安装请参照 CENTOS7安装最新版的CMKE3 CENTOS7安装最新Perl环境
安装CAMKE3
查找最新版本的cmake。我们直接渠道cmake官方网站去查吧:https://cmake.org/files/
选择最新版本下载到本地,解压缩
cd ~/nginxsrc

wget https://cmake.org/files/v3.16/cmake-3.16.0-rc2.tar.gz

tar xvzf cmake*
安装编译依赖。
yum install -y gcc gcc-c++ make automake openssl-devel开始编译,依次运行以下命令。
cd cmake-*

./bootstrap

gmake

gmake install

# 版本验证
/usr/local/bin/cmake --version
移除旧版本cmake,建立新的软链,再次验证,成功输出版本号即为成功
yum remove cmake -y

ln -s /usr/local/bin/cmake /usr/bin/

cmake --version
升级Perl
下载5.30.0版本
wget https://www.cpan.org/src/5.0/perl-5.30.0.tar.gz
tar -xzf perl-5.30.0.tar.gz
cd perl-5.30.0
./Configure -des -Dprefix=$HOME/localperl
make
make test
make install

make install安装完成后要注意安装目录实际在哪里。比如我安装的就在/root/localperl
修改链接,不建议删除,还是备份比较好
mv /usr/bin/perl /usr/bin/perl.bak

# 建立新的软链接
ln -s /usr/localperl/bin/perl /usr/bin/perl

# 接下来检测新版本是否生效,查看版本号是否为你安装的版本。
perl -v
安装 GCC(4.8+)和Clang、Go语言 ;安装Rust和 cargo
yum install gcc clang go -y
yum install rust cargo -y
修改 cargo 仓库地址,避免构建过程连接超时
vim ~/.cargo/config
[source.crates-io]
#registry = "https://github.com/rust-lang/crates.io-index"

# 替换成你偏好的镜像源
replace-with = 'ustc'
#replace-with = 'sjtu'

# 清华大学
[source.tuna]
registry = "https://mirrors.tuna.tsinghua.edu.cn/git/crates.io-index.git"

# 中国科学技术大学
[source.ustc]
registry = "git://mirrors.ustc.edu.cn/crates.io-index"

# 上海交通大学
[source.sjtu]
registry = "https://mirrors.sjtug.sjtu.edu.cn/git/crates.io-index"

# rustcc社区
[source.rustcc]
registry = "git://crates.rustcc.cn/crates.io-index"
编译安装
- NGINX编译设置
NGINX 的 configure 设置必须包括以下设置:
--with-http_ssl_module --with-http_v2_module --with-http_v3_module --with-openssl=../quiche/deps/boringssl --with-quiche=../quiche例如
注意: quic版本下无法支持 lua-nginx-module 模块,目前只能跳过参数进行编译
cd ~/nginxsrc/nginx-1.18.0

./configure --prefix=/usr/local/nginx-1.18.0 --with-http_v2_module --with-http_realip_module --with-http_addition_module --with-pcre --with-http_sub_module --with-http_dav_module --with-http_flv_module --with-http_image_filter_module --with-http_mp4_module --with-http_ssl_module --with-http_gzip_static_module --with-http_random_index_module --with-http_secure_link_module --with-http_stub_status_module --with-http_auth_request_module --with-http_degradation_module --with-http_gunzip_module --with-file-aio --add-module=/tmp/nginxsrc/ngx_devel_kit-0.3.0 --add-module=/tmp/nginxsrc/audio-nginx-module --with-debug --with-http_v3_module --with-openssl=../deps/boringssl --with-quiche=../quiche

make
make install
编译完成NGINX配置文件设置
NGINX编译完成后建立自己的网站,NGINX网站配置文件中需包括以下配置,注意对应区块的位置。
- 例如:
http {
    server {
        # Enable QUIC and HTTP/3.
        listen 443 quic reuseport;
        # Enable HTTP/2 (optional).
        listen 443 ssl http2;

        ssl_certificate      cert.crt;
        ssl_certificate_key  cert.key;

        # Enable all TLS versions (TLSv1.3 is required for QUIC).
        ssl_protocols TLSv1 TLSv1.1 TLSv1.2 TLSv1.3;

        # Add Alt-Svc header to negotiate HTTP/3.
        add_header alt-svc 'h3-23=":443"; ma=86400';
    }
}
参考配置
- 需要保留ssl配置,做首次连接交互
server {
    listen    8443 ssl http2 ;
    listen    8443 quic reuseport ;

    server_name  draft.nestealin.com ;

    charset utf-8;
    access_log  logs/draft.nestealin.com.access.main.log  main;
    error_log  logs/draft.nestealin.com.error.log error;


    ssl_certificate      /data/keys/server.cer;
    ssl_certificate_key  /data/keys/server.key;
    ssl_session_timeout  5m;
    ssl_protocols TLSv1 TLSv1.1 TLSv1.2 TLSv1.3;
    ssl_ecdh_curve X25519:P-256:P-384;
    ssl_ciphers TLS13-CHACHA20-POLY1305-SHA256:TLS13-AES-256-GCM-SHA384:TLS13-AES-128-GCM-SHA256:ECDHE-ECDSA-AES128-GCM-SHA256:ECDHE-ECDSA-CHACHA20-POLY1305:ECDHE-RSA-AES128-GCM-SHA256:ECDHE-RSA-CHACHA20-POLY1305:EECDH+CHACHA20:EECDH+AES128;


    # 该选项用于开启address validation,但是会和0-RTT冲突
    #quic_retry on;

    # 开启 TLS 1.3 0-RTT
    ssl_early_data on;
    # 添加 Early-Data 头告知后端, 防止重放攻击
    proxy_set_header Early-Data $ssl_early_data;

    # 参考nginx官方目前支持的http3版本,我们添加对应的header
    # Nginx自举8443端口,向客户端声明该端口同时还支持其它哪些协议版本
    add_header Alt-Svc 'h3-29=":8443"; ma=2592000,h3-T051=":8443"; ma=2592000,h3-Q050=":8443"; ma=2592000,h3-Q046=":8443"; ma=2592000,h3-Q043=":8443"; ma=2592000,quic=":8443"; ma=2592000; v="46,43"';  # 兼容不支持QUIC的浏览器

    add_header Strict-Transport-Security "max-age=63072000; includeSubDomains; preload";

    set $origin_root /data/blog/;
    root $origin_root ;

    location / {
        root $origin_root ;
        index index.html;
        if (!-e $request_filename) {
            rewrite ^/(.*)$  / redirect;
        }
    }
}
验证结果
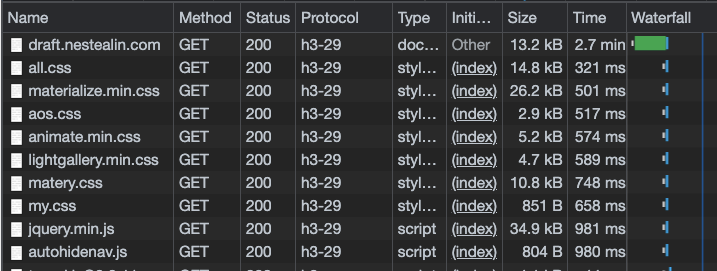
检查HTTP3开启效果:
在CHROME浏览器开发工具中NETWORK中点击对应页面,查看 Response headers 出现
alt-svc: h3-29=":8443"; ma=2592000,即为正确实现了NGINX HTTP3:QUIC.
可能遇到的问题
在 nginx make 的过程中可能出现 Updating crates.io index 报错中断
原因是拉取 crates.io 仓库代码会非常慢,导致超时导致引用库没法编译,参考 “准备编译环境” 中配置仓库即可解决。
题外话:第四方改进方案
如果CLOUDFLARE的quiche是第三方改造方案的话,我还发现了另一个大佬的第四方改造方案。
我在另一博主的改进的补丁集中发现了另外一个补丁,更新更快并且适配了新版本的NGINX1.17.4。使用方法类型直接下载补丁打到NGINX目录,同事需要手动下载quice,但是不再打quice中的补丁。其他安装一样。

